 AI项目博客
Spring AI Alibaba Graph 支持两种执行方式:
- 流式执行:使用 compiledGraph.stream() 方法,实时获取每个节点的输出,适合需要实时反馈的场景
- 同步执行:使用 compiledGraph.invoke() 方法,等待整个工作流执行完成后返回最终结果
流式执行示例
import com.alibaba.cloud.ai.graph.CompiledGraph;
import com.alibaba.cloud.ai.graph.CompileConfig;
import com.alibaba.cloud.ai.graph.NodeOutput;
import com.alibaba.cloud.ai.graph.streaming.StreamingOutput;

import java.util.Map;

// 编译工作流
CompiledGraph compiledGraph = workflow.compile(CompileConfig.builder().build());

// 流式执行,实时获取每个节点的输出
NodeOutput lastOutput = compiledGraph.stream(Map.of("input", "请分析2024年AI行业发展趋势"))
  .doOnNext(output -> {
      if (output instanceof StreamingOutput<?> streamingOutput) {
          if (streamingOutput.message() != null) {
              // streaming output from streaming llm node
              System.out.println("Streaming output from node " + streamingOutput.node() + ": " + streamingOutput.message().getText());
          } else {
              // output from normal node, investigate the state to get the node data
              System.out.println("Output from node " + streamingOutput.node() + ": " + streamingOutput.state().data());
          }
      }
  })
  .blockLast();

// 获取最终状态
System.out.println("最终结果: " + lastOutput.state().data());
同步执行示例
import com.alibaba.cloud.ai.graph.CompiledGraph;
import com.alibaba.cloud.ai.graph.CompileConfig;
import com.alibaba.cloud.ai.graph.OverAllState;
import com.alibaba.cloud.ai.graph.RunnableConfig;
import com.alibaba.cloud.ai.graph.StateGraph;
import com.alibaba.cloud.ai.graph.KeyStrategyFactory;
import com.alibaba.cloud.ai.graph.KeyStrategy;
import com.alibaba.cloud.ai.graph.state.strategy.ReplaceStrategy;
import com.alibaba.cloud.ai.graph.action.NodeAction;

import java.util.HashMap;
import java.util.Map;
import java.util.Optional;

import static com.alibaba.cloud.ai.graph.action.AsyncNodeAction.node_async;

public class WorkflowExecutor {

  public void executeWorkflow() throws Exception {
      // 创建简单的工作流
      KeyStrategyFactory keyStrategyFactory = () -> {
          HashMap<String, KeyStrategy> strategies = new HashMap<>();
          strategies.put("input", new ReplaceStrategy());
          strategies.put("output", new ReplaceStrategy());
          return strategies;
      };

      StateGraph workflow = new StateGraph(keyStrategyFactory);

      class SimpleNode implements NodeAction {
          @Override
          public Map<String, Object> apply(OverAllState state) throws Exception {
              String input = state.value("input", "").toString();
              return Map.of("output", "Processed: " + input);
          }
      }

      workflow.addNode("process", node_async(new SimpleNode()));
      workflow.addEdge(StateGraph.START, "process");
      workflow.addEdge("process", StateGraph.END);

      // 编译工作流
      CompileConfig compileConfig = CompileConfig.builder().build();
      CompiledGraph compiledGraph = workflow.compile(compileConfig);

      // 准备输入
      Map<String, Object> input = Map.of(
          "input", "请分析2024年AI行业发展趋势"
      );

      // 配置运行参数
      RunnableConfig runnableConfig = RunnableConfig.builder()
          .threadId("workflow-001")
          .build();

      // 执行工作流(同步调用)
      Optional<OverAllState> result = compiledGraph.invoke(input, runnableConfig);

      // 处理结果
      result.ifPresent(state -> {
          System.out.println("输入: " + state.value("input").orElse("无"));
          System.out.println("输出: " + state.value("output").orElse("无"));
      });

      System.out.println("工作流执行完成");
  }
}- 明确角色定位:为每个 Agent 设置清晰的职责和指令,使用 .instruction() 方法定义 Agent 的角色
- 合理配置工具:只为 Agent 提供其角色所需的工具,避免工具过多导致选择困难
- 设置输出键名:使用 .outputKey() 方法为 Agent 设置输出键名,便于在工作流中访问结果
- 控制上下文传递:根据需要配置 includeContents 参数,避免不必要的上下文传递
- 优化输出格式:使用 returnReasoningContents 控制返回内容的详细程度
- 启用日志记录:使用 .enableLogging(true) 启用日志,便于调试和监控
- 错误处理:在 Agent 外层添加错误处理 Node,确保流程的健壮性
- 流式处理:使用 compiledGraph.stream() 进行流式处理,实时获取节点输出;使用 compiledGraph.invoke() 进行同步调用
对于包含多个 Agent 的复杂工作流:
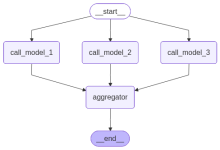
- 并行执行:对于相互独立的 Agent,使用并行节点提高效率
- 缓存结果:对于重复计算,考虑使用状态缓存
- 超时控制:为每个 Agent 设置合理的超时时间
- 资源管理:合理配置 ChatModel 的连接池和并发参数
// 并行执行示例
workflow.addNode("parallel_start", node_async(new TransparentNode()));

// 添加多个并行 Agent(注意:outputKey 在 builder 中设置)
ReactAgent agent1 = ReactAgent.builder()
  .name("agent1")
  .model(chatModel)
  .instruction("Agent 1 的指令")
  .outputKey("result1")
  .build();

ReactAgent agent2 = ReactAgent.builder()
  .name("agent2")
  .model(chatModel)
  .instruction("Agent 2 的指令")
  .outputKey("result2")
  .build();

ReactAgent agent3 = ReactAgent.builder()
  .name("agent3")
  .model(chatModel)
  .instruction("Agent 3 的指令")
  .outputKey("result3")
  .build();

workflow.addNode("agent1", agent1.asNode(true, false));
workflow.addNode("agent2", agent2.asNode(true, false));
workflow.addNode("agent3", agent3.asNode(true, false));

// 聚合结果
workflow.addNode("aggregator", node_async(new ParallelResultAggregatorNode("merged_result")));

// 设置并行执行
workflow.addEdge(StateGraph.START, "parallel_start");
workflow.addEdge("parallel_start", List.of("agent1", "agent2", "agent3"));
workflow.addEdge(List.of("agent1", "agent2", "agent3"), "aggregator");
workflow.addEdge("aggregator", StateGraph.END);
使用 Spring AI Alibaba Admin 平台,可以实现 Dify DSL 到 Spring AI Alibaba 高代码工程的导出。
压测数据
压测集群规格
- Spring AI Alibaba 工程,独立部署的容器,保持默认线程池等配置参数,2个POD,POD 规格 2C4G
- Dify 平台,官方部署方式,保持默认配置参数,每个组件都拉起2个POD,POD 规格 2C4G
有效并发处理上限
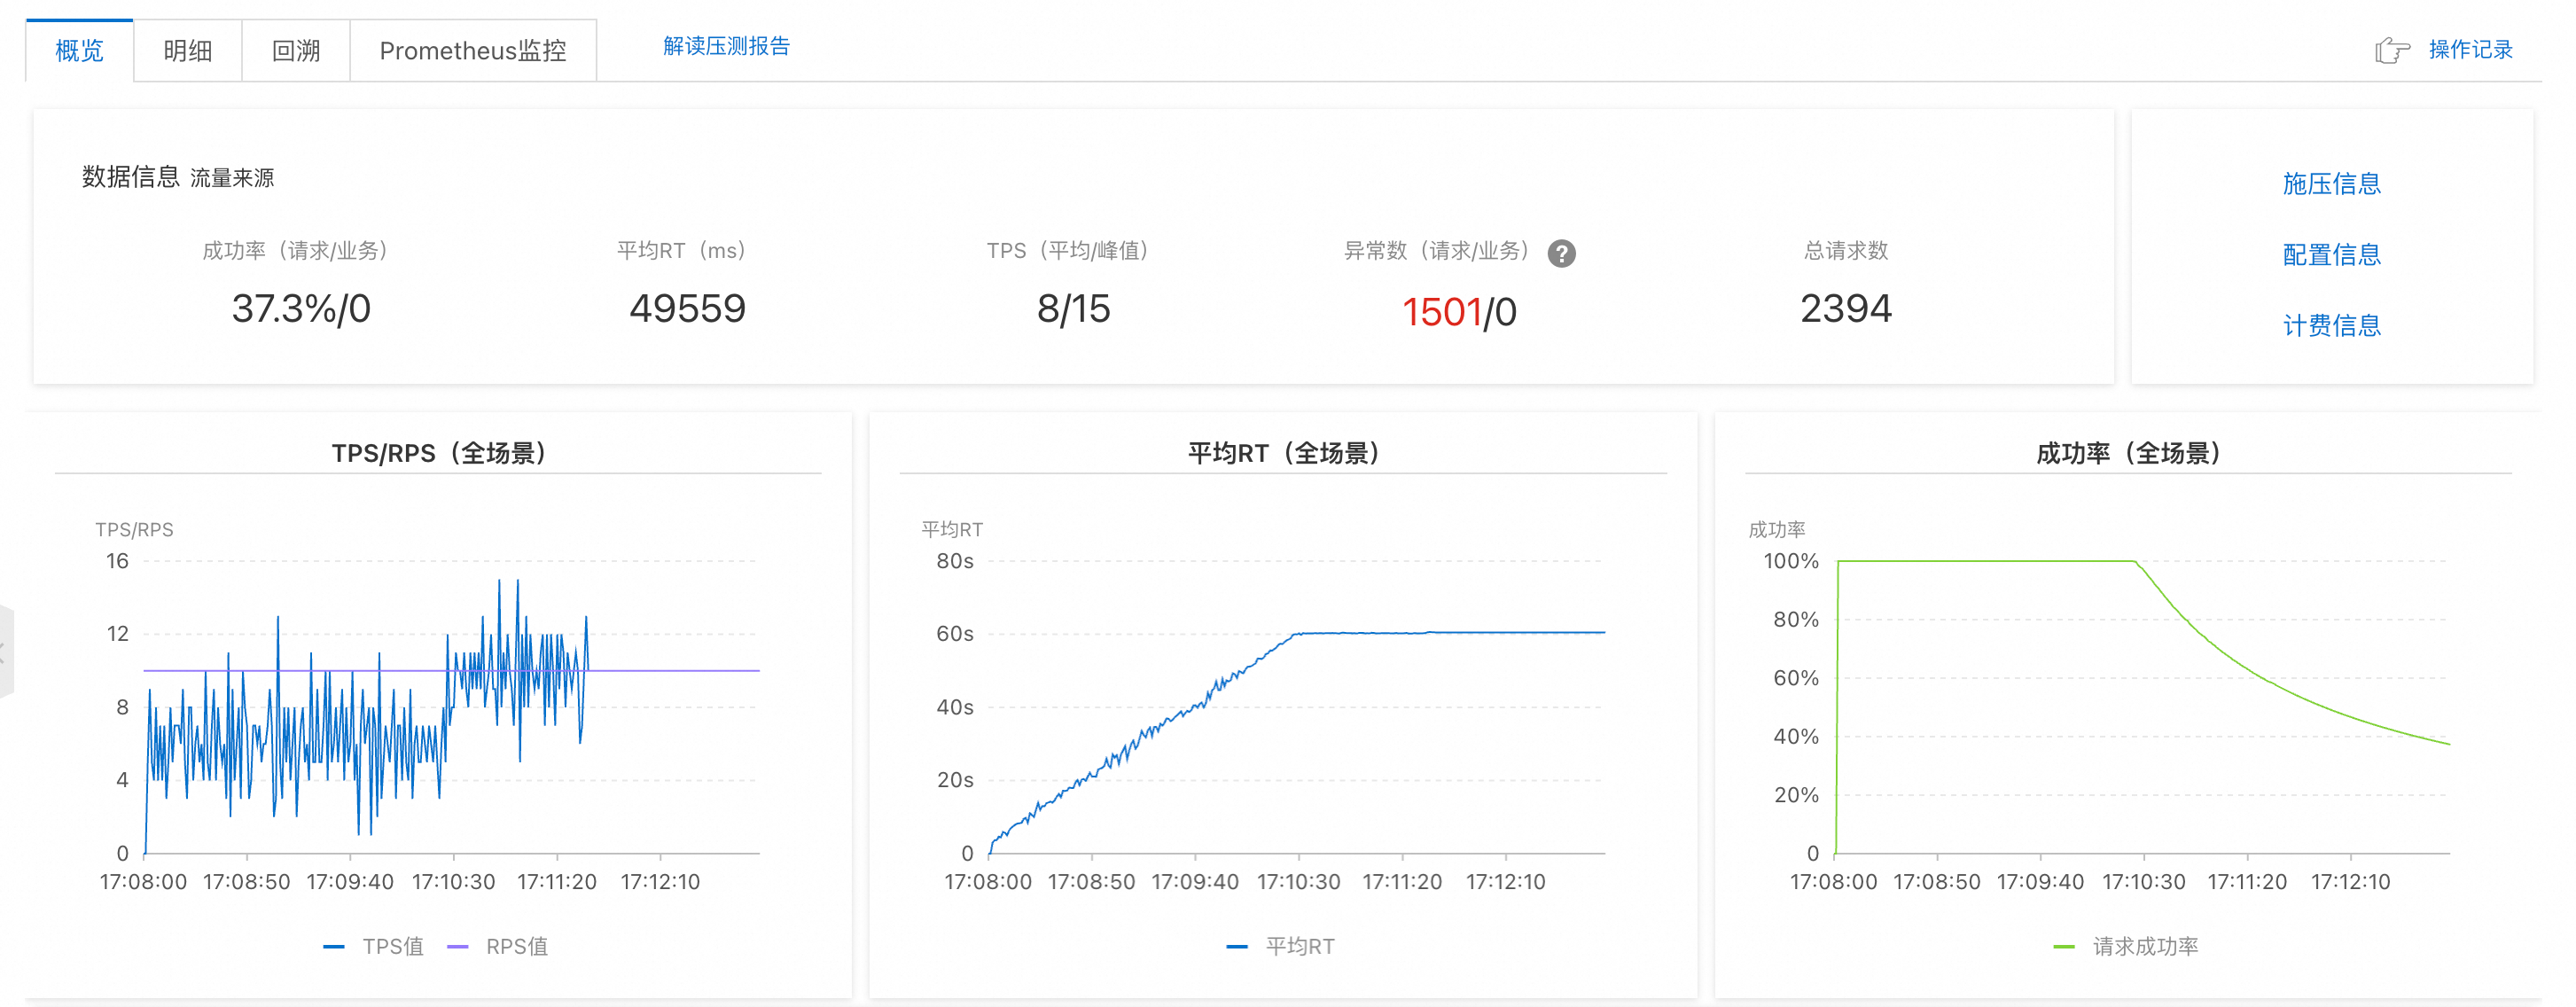
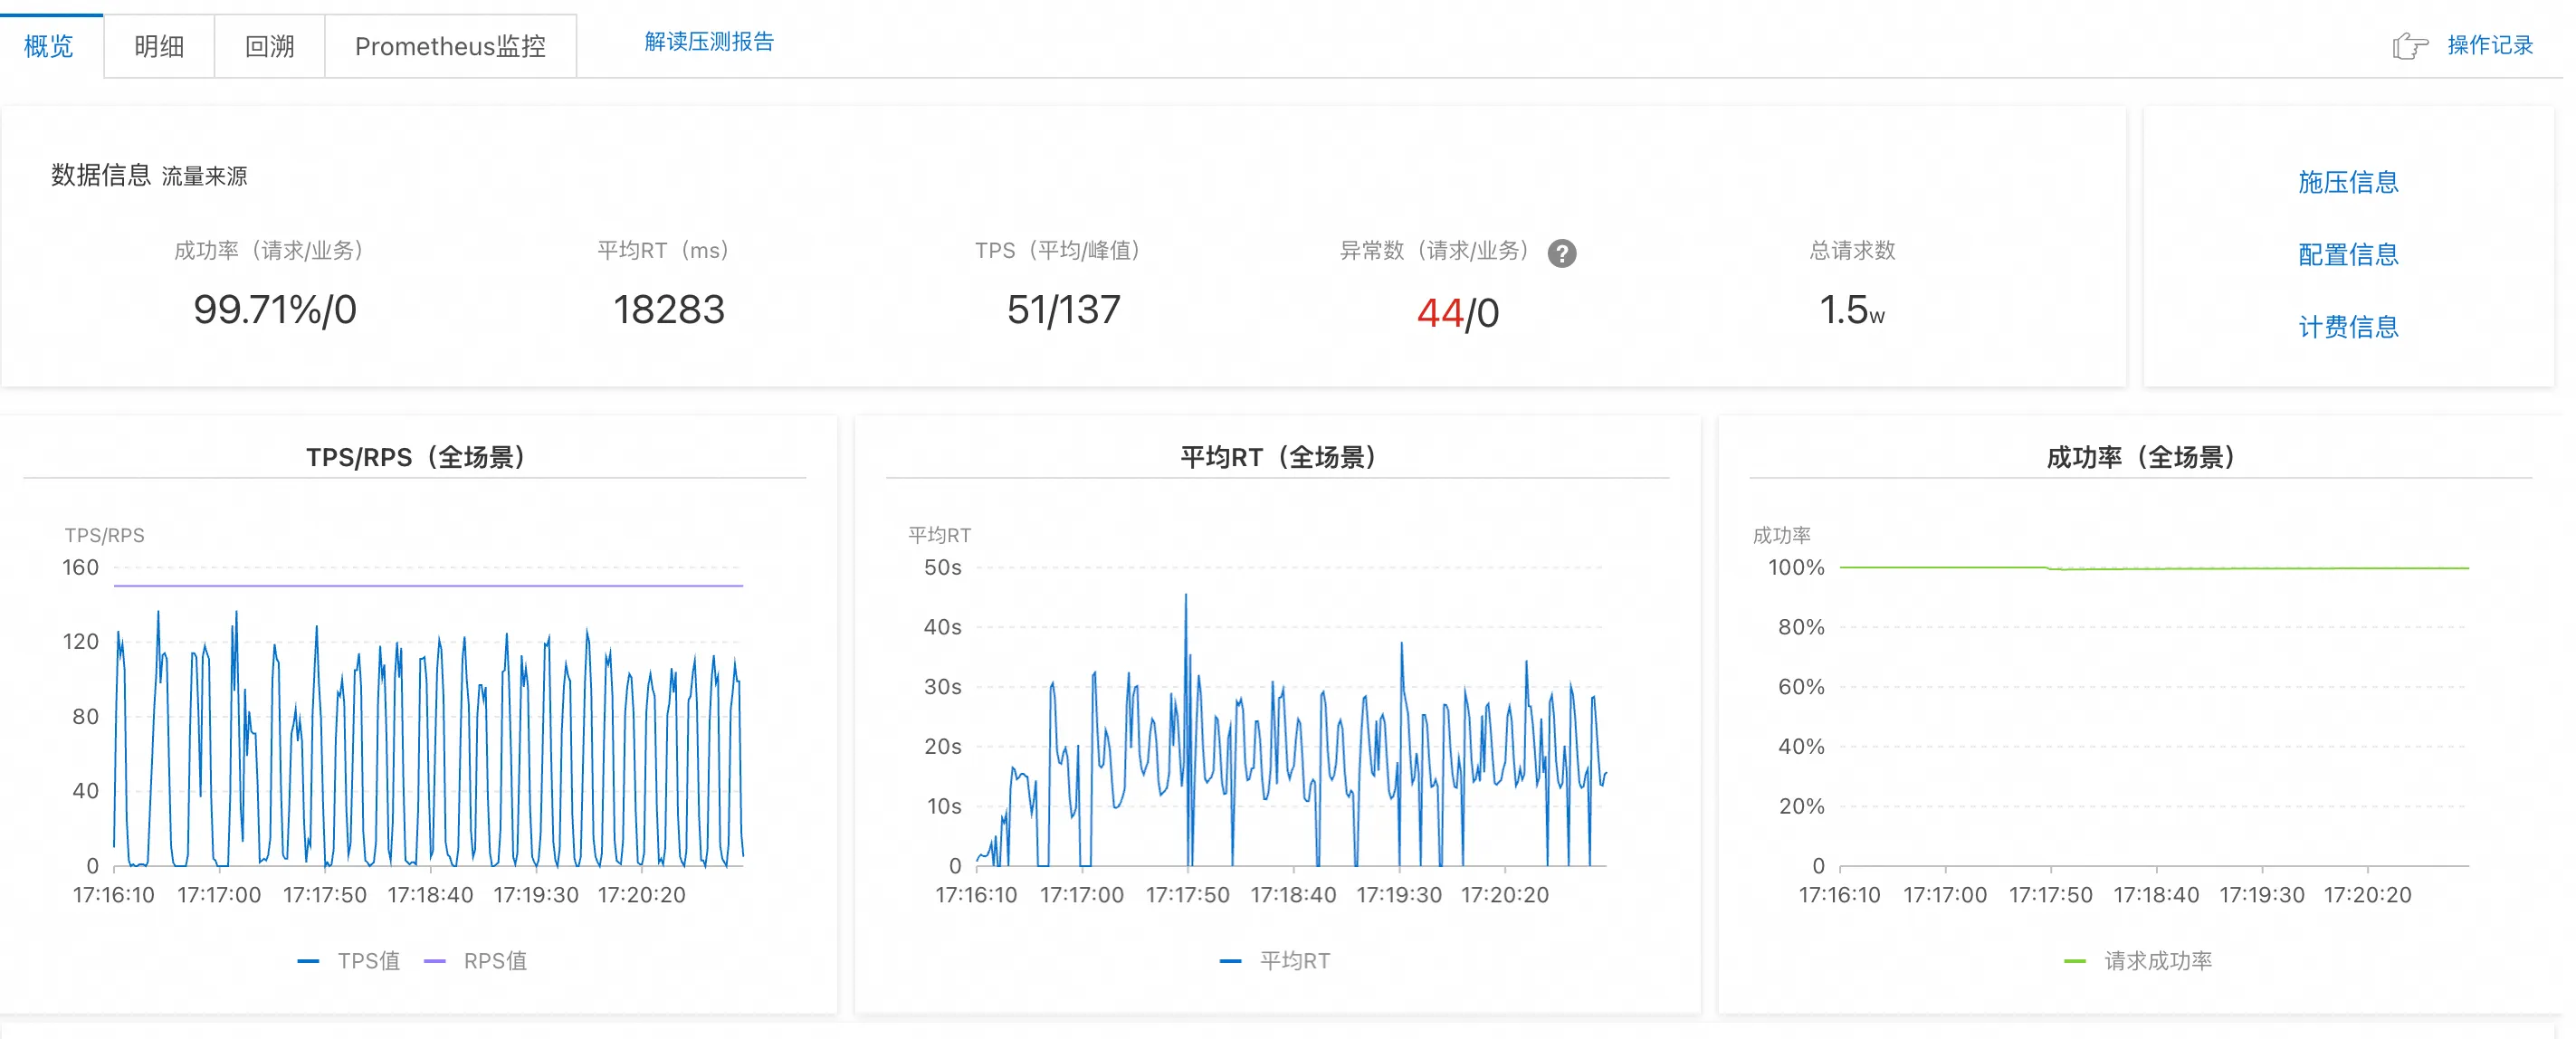
- 压测方式: 每个场景从 10 个 RPS(Request Per Second)开始,逐步提升,直到提升 RPS 值并不能带来 TPS 提升、成功率答复下降。
- 结论: Dify 能处理的上限 RPS < 10;Spring AI Alibaba 能处理的上限 RPS 约 150。
Dify 压测截图:
Spring AI Alibaba 压测截图:
极限场景下的吞吐量
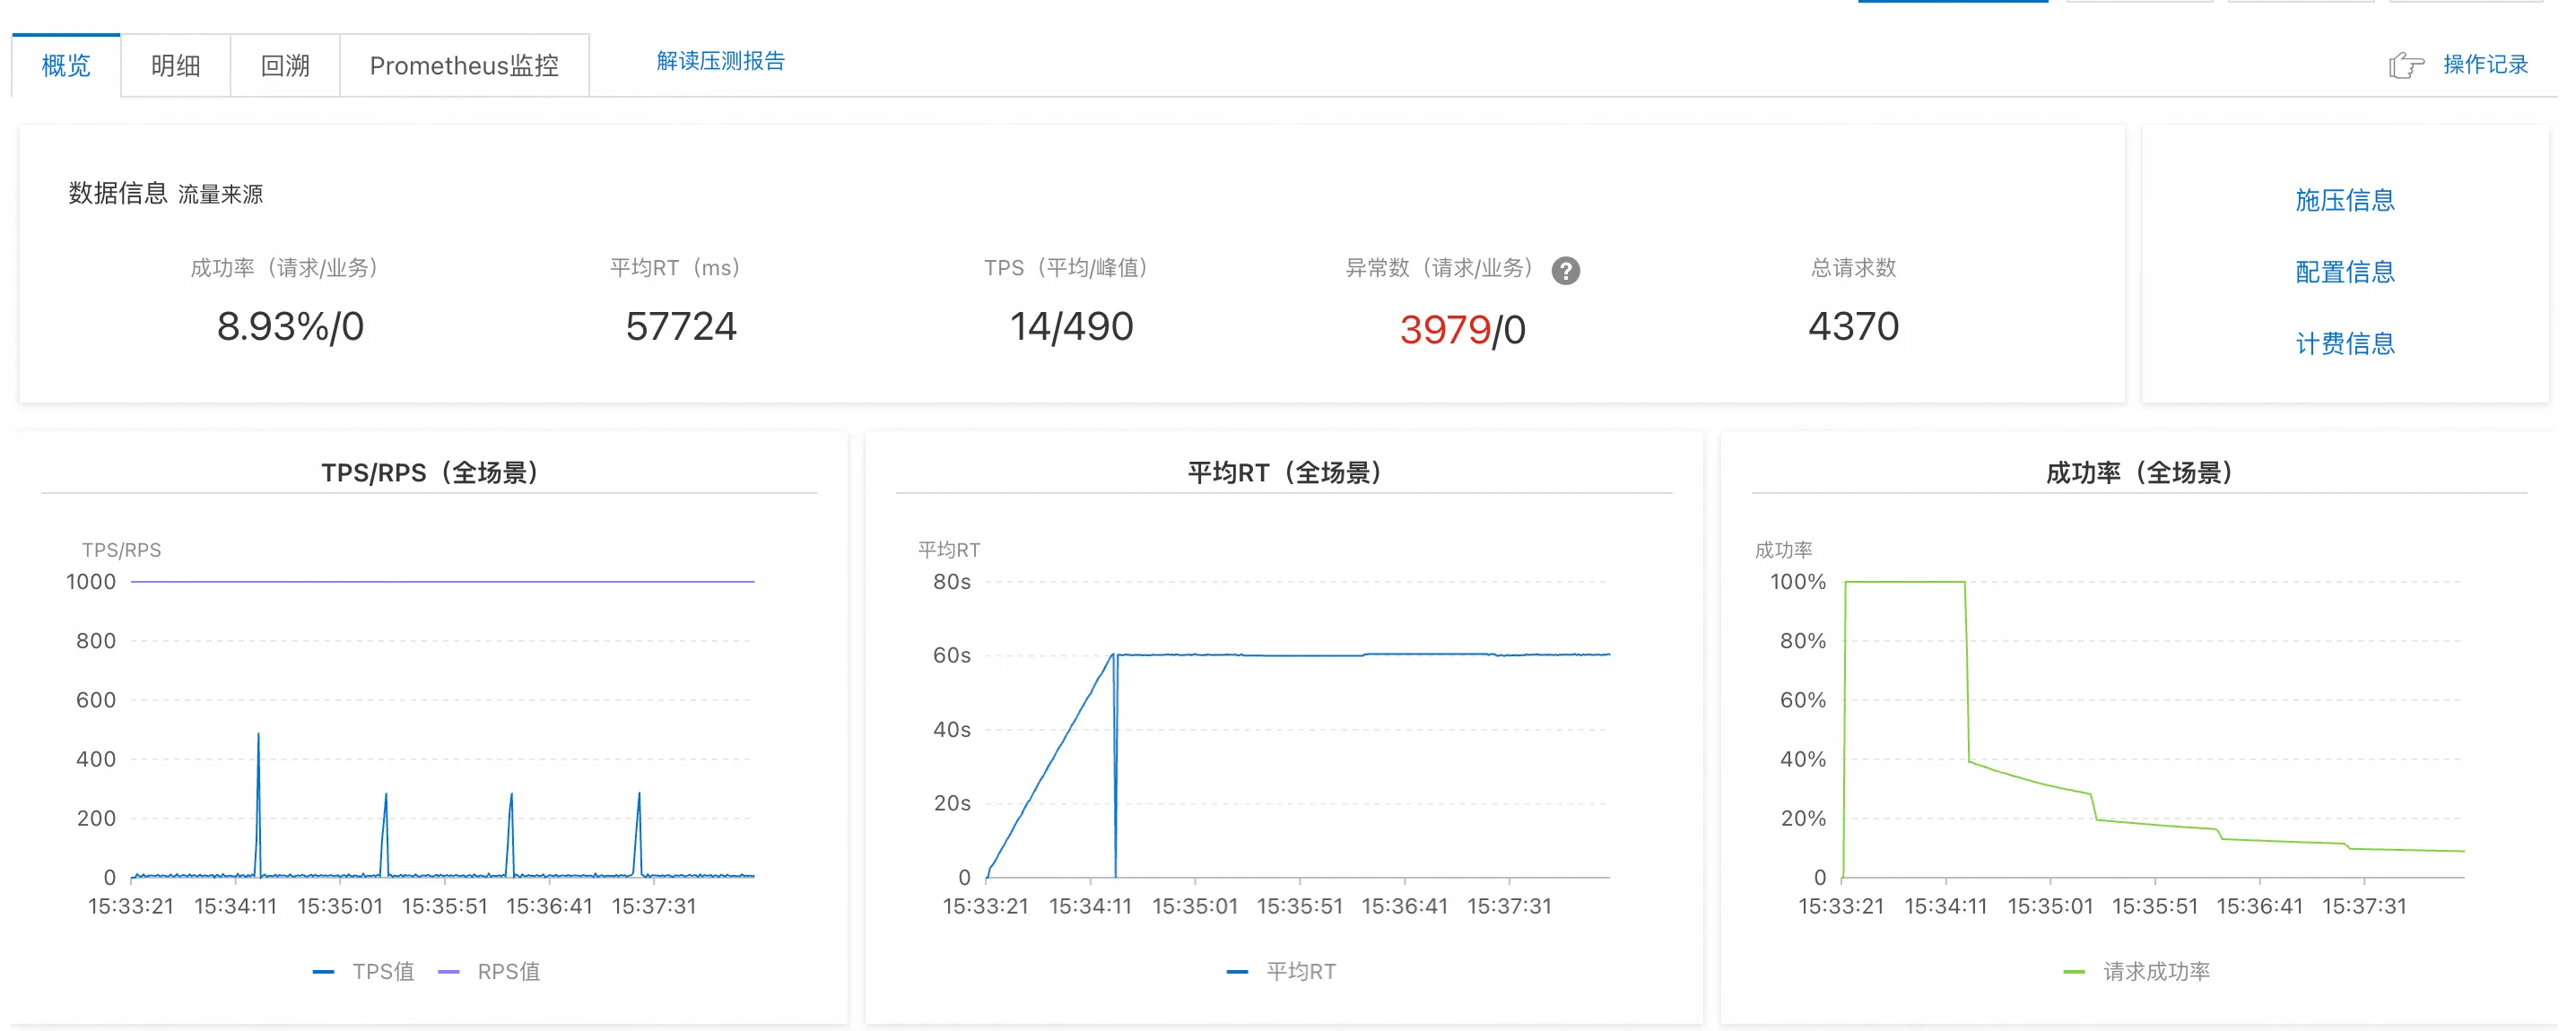
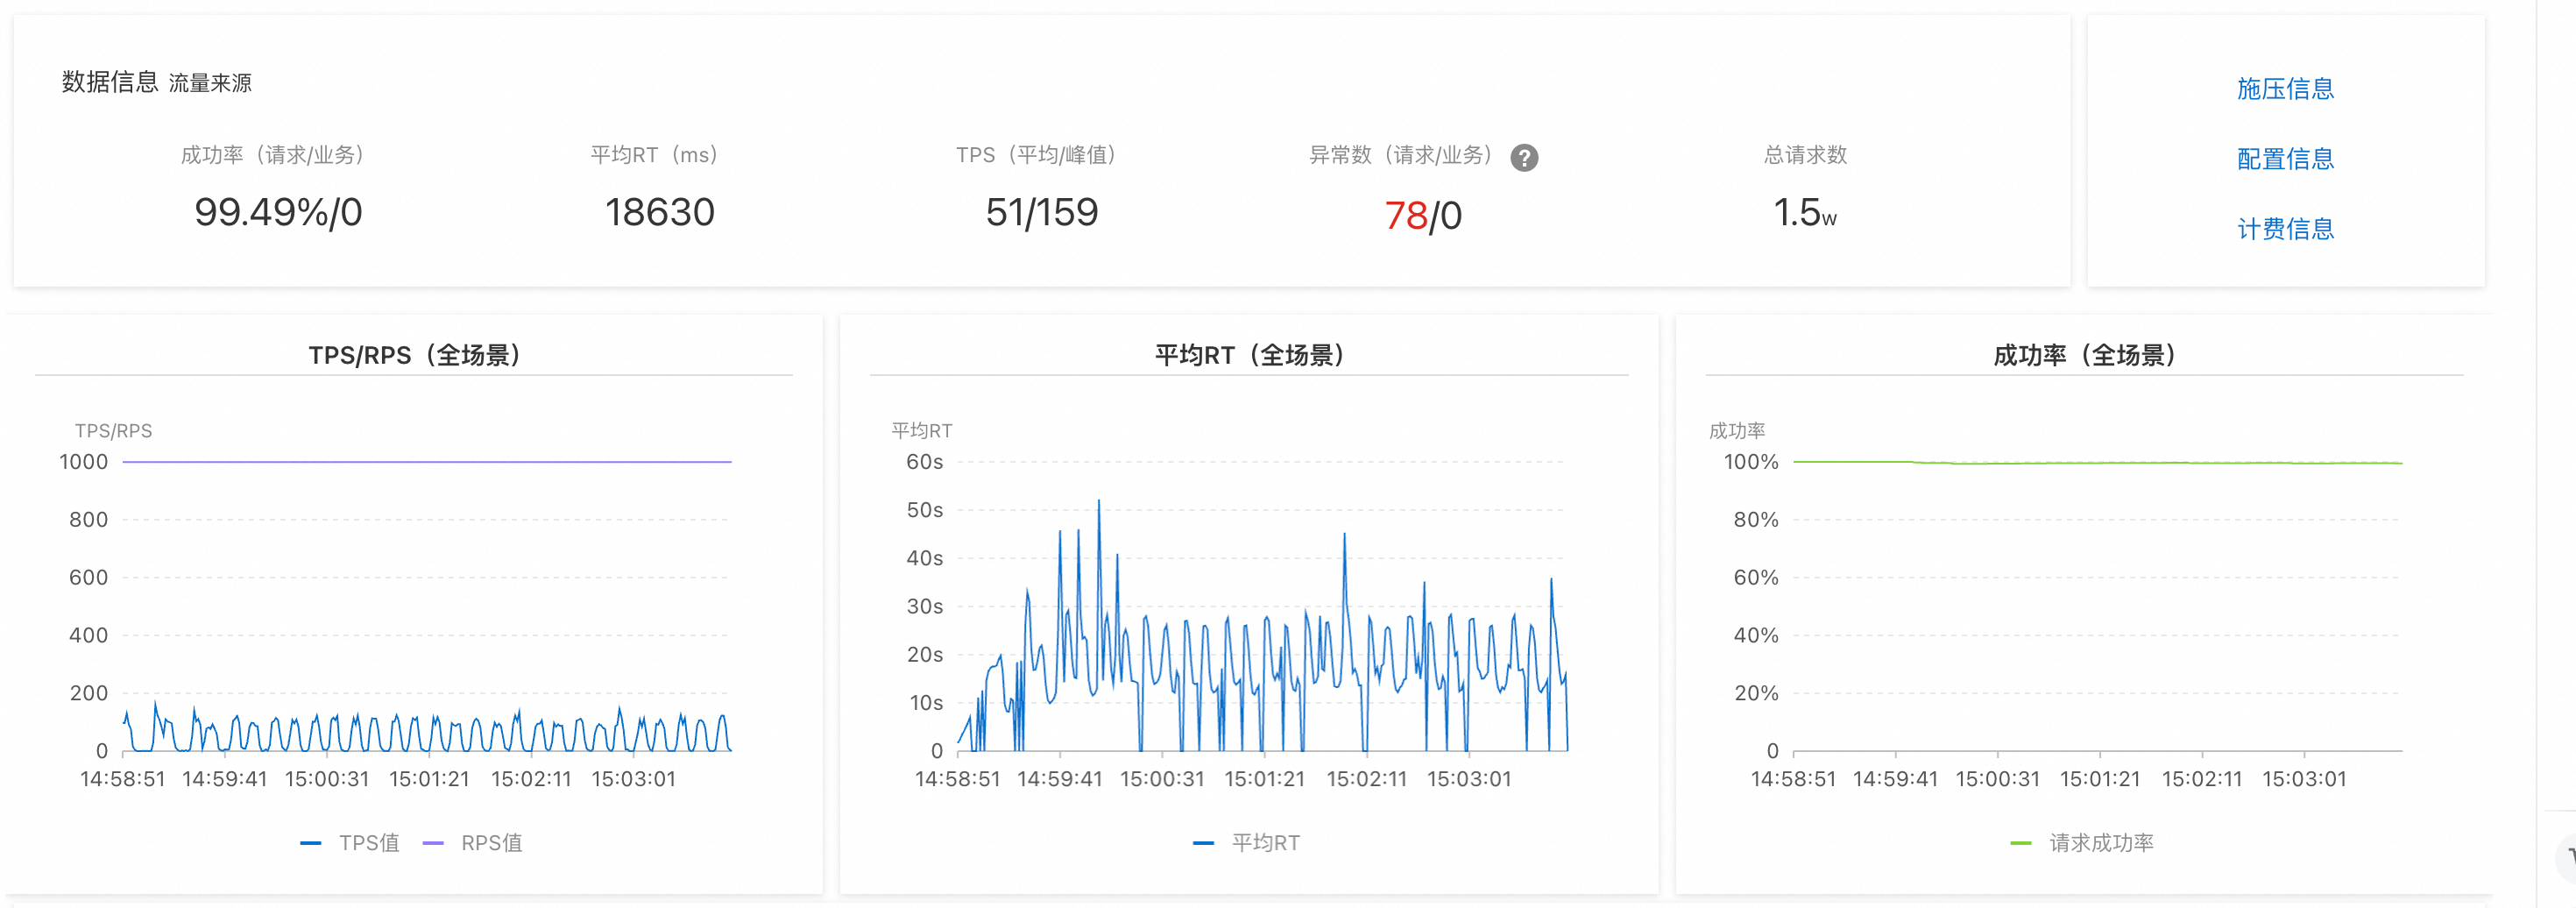
- 压测方式: 给集群远高于合理并发的压测请求量(测试场景为 1000 RPS),看集群的吞吐量、成功率变化。
- 结论: Dify 在此场景下成功率小于 10%,平均 RT 接近 60s,大部分请求出现超时(响应大于 60s);Spring AI Alibaba 成功率变化不大,维持 99% 以上,平均 RT 也在 18s 左右。
Dify 压测截图:
Spring AI Alibaba 压测截图:
- Graph 框架文档
本文整理自 Spring AI Alibaba 官方文档《工作流编排》:https://java2ai.com/docs/frameworks/agent-framework/advanced/workflow