 AI项目博客
Dify 是目前用得比较多的开源 LLM 应用开发平台,但官方文档主要讲「怎么用」,部署这一步散在各处。这篇把全平台的本地化部署过程整理成一条线:环境检查 → 依赖安装(Windows / Linux / macOS)→ 启动 Dify → 验证 → 配置模型供应商 → 日常维护与排错。
文中命令与配置均来自实际部署记录,覆盖 Docker 镜像源配置、8 个容器的职责分工、以及五类常见故障的定位方法。原文发布于 CSDN,作者鱼日先生,版权信息见文末。
一、环境要求
1.1 硬件要求
| 项目 | 最低要求 | 推荐配置 |
|---|---|---|
| CPU | x86_64 双核 | 4 核及以上 |
| 内存 | 8GB 可用 | 16GB+ |
| 磁盘 | 10GB 可用 | 50GB+ |
| 网络 | 可拉取 Docker 镜像 + 访问模型 API | 宽带连接 |
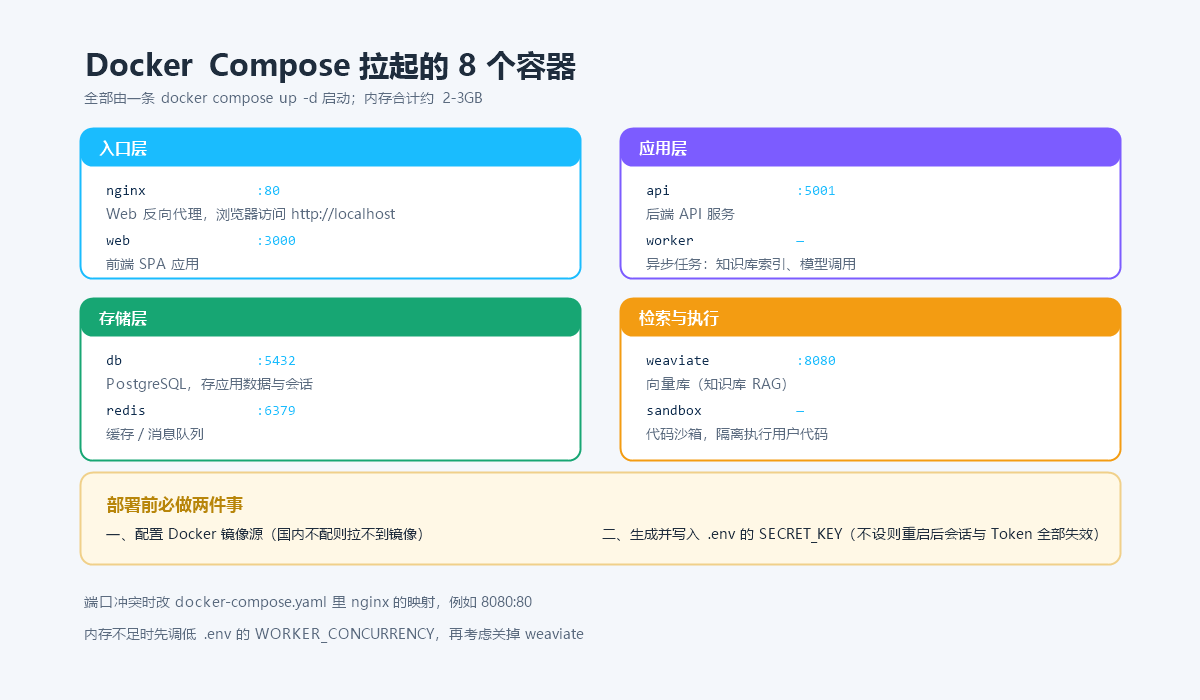
内存说明:Dify 默认启动 8 个容器(PostgreSQL / Redis / Weaviate / Nginx / API / Worker / Web / Sandbox),合计占用约 2-3GB 内存。8GB 是跑起来的下限,16GB 以上才比较从容。如果同时运行本地模型,建议 32GB+。
1.2 软件要求
| 软件 | 版本要求 | 说明 |
|---|---|---|
| Docker Engine | 24.0+ | 本机使用 29.5.3 |
| Docker Compose | v2.0+ | 本机使用 v5.1.4(Docker Desktop 已内置) |
| Git | 可选 | 用于克隆 Dify 仓库 |
| 浏览器 | Chrome / Edge 最新版 | 访问 Dify Web UI |
1.3 环境检查
# 操作系统
uname -a                                     # Linux / macOS
winver                                       # Windows(运行对话框运行)

# Docker
docker --version                             # 需要 >= 24.0
docker compose version                       # 需要 v2+

# 内存
free -h                                      # Linux / macOS
systeminfo | findstr "物理内存"               # Windows

# 磁盘
df -h /                                      # Linux / macOS
wmic logicaldisk get size,freespace,caption   # Windows
二、依赖安装(按平台)
2.1 Windows
安装 Docker Desktop
- 访问
docker.com/products/docker-desktop下载 - 运行安装程序,按提示完成安装
- 关键设置:Settings → General → 勾选 「Use WSL 2 based engine」
- 安装完成后重启电脑
# 验证安装
docker --version
docker compose version
安装 Git(可选)
winget install Git.Git配置 Docker 镜像源(国内环境必配)
打开 Docker Desktop → Settings → Docker Engine,修改 daemon.json:
{
  "registry-mirrors": [
    "https://docker.1ms.run",
    "https://docker.xuanyuan.me"
  ]
}
点击「Apply & Restart」。
Docker Hub 官方 registry 在中国大陆已被屏蔽,不配置镜像源将无法拉取镜像。以上镜像源于 2026 年 7 月验证可用。
2.2 Linux(Ubuntu / Debian)
安装 Docker
# 卸载旧版本
sudo apt remove docker docker-engine docker.io containerd runc

# 安装依赖
sudo apt update
sudo apt install -y ca-certificates curl gnupg

# 添加 Docker 官方 GPG 密钥
sudo install -m 0755 -d /etc/apt/keyrings
curl -fsSL https://download.docker.com/linux/ubuntu/gpg | sudo gpg --dearmor -o /etc/apt/keyrings/docker.gpg
sudo chmod a+r /etc/apt/keyrings/docker.gpg

# 添加仓库
echo \
  "deb [arch=$(dpkg --print-architecture) signed-by=/etc/apt/keyrings/docker.gpg] https://download.docker.com/linux/ubuntu \
  $(. /etc/os-release && echo "$VERSION_CODENAME") stable" | \
  sudo tee /etc/apt/sources.list.d/docker.list > /dev/null

# 安装 Docker
sudo apt update
sudo apt install -y docker-ce docker-ce-cli containerd.io docker-compose-plugin

# 将当前用户加入 docker 组(避免每次 sudo)
sudo usermod -aG docker $USER

# 退出并重新登录,或执行:
newgrp docker

# 验证
docker --version
docker compose version
配置 Docker 镜像源(国内环境)
sudo mkdir -p /etc/docker
sudo tee /etc/docker/daemon.json <<-'EOF'
{
  "registry-mirrors": [
    "https://docker.1ms.run",
    "https://docker.xuanyuan.me"
  ]
}
EOF
sudo systemctl daemon-reload
sudo systemctl restart docker

# 验证镜像源是否生效
docker info | grep -A 5 "Registry Mirrors"
安装 Git
sudo apt install -y git2.3 macOS
安装 Docker Desktop
- 访问
docker.com/products/docker-desktop下载 - 选择对应芯片的版本:Apple Silicon(M 芯片)或 Intel
- 安装完成后启动 Docker Desktop
# 验证安装
docker --version
docker compose version
安装 Git
# 使用 Homebrew
brew install git
配置 Docker 镜像源(国内环境)
Docker Desktop → Settings → Docker Engine,修改 daemon.json:
{
  "registry-mirrors": [
    "https://docker.1ms.run",
    "https://docker.xuanyuan.me"
  ]
}
点击「Apply & Restart」。
三、部署 Dify
3.1 获取源码
# 方案一:GitHub 官方仓库
git clone https://github.com/langgenius/dify.git
cd dify

# 方案二:国内加速(GitHub 被墙时使用)
git clone https://gitee.com/langgenius/dify.git
cd dify
3.2 进入 Docker 目录
cd docker3.3 配置环境变量
# 复制环境变量模板
cp .env.example .env
必须修改的关键配置(用文本编辑器打开 .env):
| 变量 | 说明 | 建议值 |
|---|---|---|
SECRET_KEY |
应用密钥,需随机生成 | 见下方生成命令 |
INIT_PASSWORD |
管理员初始密码 | 修改为强密码 |
生成 SECRET_KEY:
# Linux / macOS
openssl rand -base64 42

# Windows PowerShell
[Convert]::ToBase64String([System.Security.Cryptography.RandomNumberGenerator]::GetBytes(32))
生产环境必须设置 SECRET_KEY,否则重启后所有会话和 Token 将失效。
3.4 启动 Dify
# 启动所有服务
docker compose up -d
首次启动需要拉取镜像,根据网络状况耗时 5-30 分钟。
启动成功后,Dify 会运行以下容器:
| 服务 | 镜像 | 端口 | 说明 |
|---|---|---|---|
| nginx | nginx:latest |
80 | Web 反向代理,通过 http://localhost 访问 |
| api | langgenius/dify-api |
5001 | 后端 API 服务 |
| worker | langgenius/dify-api |
— | 异步任务处理(知识库索引、模型调用等) |
| web | langgenius/dify-web |
3000 | 前端 SPA 应用,Nginx 反代 |
| db | postgres:15-alpine |
5432 | PostgreSQL 数据库 |
| redis | redis:7-alpine |
6379 | 缓存 / 消息队列 |
| weaviate | semitechnologies/weaviate |
8080 | 向量数据库(知识库 RAG) |
| sandbox | langgenius/dify-sandbox |
— | 代码沙箱(安全执行用户代码) |
3.5 查看启动日志
# 所有服务日志
docker compose logs -f

# 只看后端
docker compose logs -f api

# 只看前端
docker compose logs -f web
看到类似输出表示启动完成:
api      | INFO:     Application startup complete.
nginx    | [notice] 1#1: start worker processes
3.6 停止 Dify
docker compose down          # 停止容器,保留数据
docker compose down -v       # ⚠️ 停止并删除数据卷(清空数据库)
3.7 更新 Dify
# 1. 拉取最新源码
git pull origin main

# 2. 拉取最新 Docker 镜像
docker compose pull

# 3. 重新启动
docker compose up -d
四、部署验证
4.1 检查容器状态
docker compose ps所有服务的 Status 应为 Up(正常)或 running。如果某服务显示 restarting 或 exited,说明有问题。
4.2 访问 Web UI
- 打开浏览器
- 访问
http://localhost(默认 80 端口) - 应看到 Dify 登录页面
- 使用
.env中配置的管理员账户和INIT_PASSWORD登录
4.3 验证 API 健康检查
# Nginx 前端代理
curl -s http://localhost/health

# 后端 API 直接访问
curl -s http://localhost:5001/health
正常响应示例:
{"status":"ok"}4.4 创建首个应用
登录后建议:
- 进入「工作室」→「创建应用」
- 选择一个模板(如「对话型应用」)
- 在「模型供应商」中配置你的 API Key(如 DeepSeek 或通义千问)
- 发送一条测试消息验证正常工作
首次登录后第一件事通常是配置模型供应商,否则应用无法调模型。
4.5 配置模型供应商(DeepSeek / 通义千问)
登录 Dify 后,点击左下角「设置」→「模型供应商」,按以下步骤接入大模型 API。
4.5.1 配置 DeepSeek
| 步骤 | 操作 |
|---|---|
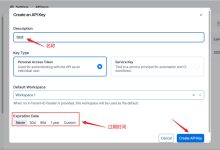
| ① 获取 API Key | 登录 DeepSeek 开放平台 → 「API Keys」→ 创建新密钥 |
| ② 在 Dify 中添加 | 设置 → 模型供应商 → 搜索「DeepSeek」→ 点击「添加」 |
| ③ 输入 API Key | 将复制的密钥粘贴到 API Key 输入框 |
| ④ 验证连接 | 点击「保存并验证」,成功后可看到可用模型列表 |
| ⑤ 设置默认模型 | 在应用中选择已添加的 DeepSeek 模型即可使用 |
DeepSeek 常用模型:
| 模型 ID | 说明 | 特点 |
|---|---|---|
deepseek-chat |
DeepSeek V3 对话模型 | 通用对话,性价比高 |
deepseek-reasoner |
DeepSeek R1 推理模型 | 支持深度推理,适合复杂任务 |
deepseek-coder |
DeepSeek 代码模型 | 编程专用,代码生成质量高 |
DeepSeek API 端点(自动填充,无需手动配置):
https://api.deepseek.com/v14.5.2 配置通义千问 / Qwen
| 步骤 | 操作 |
|---|---|
| ① 获取 API Key | 登录百炼控制台 → 「API-KEY 管理」→ 创建密钥 |
| ② 在 Dify 中添加 | 设置 → 模型供应商 → 搜索「Qwen」或「通义千问」→ 点击「添加」 |
| ③ 输入 API Key | 粘贴获取到的 API Key |
| ④ 验证连接 | 点击「保存并验证」 |
| ⑤ 设置默认模型 | 选择 Qwen 模型即可使用 |
通义千问常用模型:
| 模型 ID | 说明 | 特点 |
|---|---|---|
qwen-plus |
通义千问 Plus | 均衡型,适合通用场景 |
qwen-max |
通义千问 Max | 最强性能,适合复杂任务 |
qwen-turbo |
通义千问 Turbo | 速度快、成本低,适合简单任务 |
qwen-vl-plus |
通义千问 VL Plus | 支持图像理解 |
qwen-coder-plus |
通义千问 Coder Plus | 编程专用 |
通义千问 API 端点(Dify 自动配置,无需手动修改):
https://dashscope.aliyuncs.com/compatible-mode/v14.5.3 注意事项
- API Key 安全:API Key 存储在 Dify 数据库中,请勿泄露。生产环境建议定期轮换密钥。
- 模型额度:部分模型(特别是通义千问 Max)有调用频率限制,注意查看控制台用量。
- 国内网络:DeepSeek 和百炼的 API 均可直接访问,无需代理。
- 首次使用:添加模型供应商后,回到「工作室」创建应用时即可在模型选择下拉中看到已添加的模型。
验证方法:创建一个新的对话应用 → 选择刚添加的模型 → 输入「你好,你是谁?」→ 如收到正常回复即配置成功。
五、常用维护命令
5.1 容器生命周期
docker compose ps                   # 查看所有容器状态
docker compose logs -f -n 100       # 查看最近的 100 行日志
docker compose restart api          # 重启后端服务
docker compose restart web          # 重启前端
docker compose up -d                # 启动/重建
docker compose down                 # 停止(保留数据)
5.2 数据库备份与恢复
备份:
# Linux / macOS
docker compose exec db pg_dump -U postgres dify > dify_backup_$(date +%Y%m%d).sql

# Windows PowerShell
docker compose exec db pg_dump -U postgres dify > dify_backup_$(Get-Date -Format yyyyMMdd).sql恢复:
# Linux / macOS
cat dify_backup_20260703.sql | docker compose exec -T db psql -U postgres dify

# Windows PowerShell
Get-Content dify_backup_20260703.sql | docker compose exec -T db psql -U postgres dify
5.3 资源监控
# 容器级资源占用
docker stats

# Docker 磁盘占用
docker system df

# 清理无用的镜像、容器、卷
docker system prune -f

# 连构建缓存一起清理
docker system prune -a -f --volumes   # ⚠️ 会清除构建缓存和未使用卷
5.4 日志管理
# 查看各服务日志位置
docker inspect --format='{{.Name}} {{.LogPath}}' $(docker ps -q)

# 日志默认大小:Docker 默认无限制,日志文件可能很大
# 建议在 docker-compose.yaml 中限制日志大小:
#
# logging:
#   driver: "json-file"
#   options:
#     max-size: "10m"
#     max-file: "3"
5.5 修改端口映射
如果 80 端口被其他服务占用,需修改端口映射:
# 编辑 docker/docker-compose.yaml,找到 nginx 服务的 ports 部分:
services:
  nginx:
    ports:
      - "8080:80"        # 将 80 改为其他端口,如 8080
改完后重启:
docker compose up -d六、常见问题排查
6.1 镜像拉取失败
Error response from daemon: pull access denied for langgenius/dify-api
 或
manifest for langgenius/dify-api:latest not found解决方法:
- 确认已配置镜像源(见 2.1-2.3 节)
- 检查网络是否能正常访问镜像源
- 尝试手动拉取测试:
docker pull docker.1ms.run/library/nginx:latest
6.2 端口 80 被占用
症状:docker compose up -d 后 nginx 一直重启
检查:
# Windows
netstat -ano | findstr :80

# Linux / macOS
sudo lsof -i :80解决:修改 docker-compose.yaml 中 nginx 的端口映射,如 "8080:80"。
6.3 内存不足
症状:容器频繁重启,或 Dify 运行缓慢
解决:
- 调低
.env中的WORKER_CONCURRENCY(工作器并发数) - 关闭不需要的服务(如 weaviate,如果不用知识库)
docker compose down停掉不必要的容器
6.4 WSL2 + Docker Desktop 引擎崩溃
症状:Docker Desktop 启动后报 WSL 相关错误
解决:
# Windows PowerShell(管理员)
wsl --shutdown
然后重启 Docker Desktop,再启动 Dify。
6.5 SECRET_KEY 未设置
症状:Dify 重启后需要重新登录,之前创建的 API Key 失效
解决:在 .env 中设置 SECRET_KEY(见 3.3 节),然后:
docker compose down
docker compose up -d
七、参考资源
| 资源 | 地址 |
|---|---|
| Dify 官方文档(自托管部署) | docs.dify.ai/getting-started/install-self-hosted |
| Dify GitHub 仓库 | github.com/langgenius/dify |
| Dify Gitee 镜像(国内) | gitee.com/langgenius/dify |
| Docker Desktop 下载 | docker.com/products/docker-desktop |
| Docker 文档 | docs.docker.com |
原文信息
- 标题:DIFY 本地化部署指南(全平台)
- 作者:鱼日先生(CSDN)
- 原文链接:https://blog.csdn.net/xluge/article/details/162555453
- 首次发布:2026-07-04;最后修改:2026-08-31
- 版权协议:CC 4.0 BY-SA